‰pژlکY‚جApache HTTP Server 2.2.6 httpd.confپ@‚جگف’è |
|||
پEƒoپ[ƒ`ƒƒƒ‹ƒzƒXƒg‚جچىگ¬پ@پ@پ@پ@پ@پ@پ@پuVirtualHostپ@پihttp://aaa.bbbb.comپjپ@URL‚إ‚جƒzپ[ƒ€ƒyپ[ƒWŒfچعپv |
|||
پEhttpd.conپ@‚جٹJ‚«•û‚ئ’چˆسژ–چ€ |
|||
Apache HTTP Server 2.2.6 ‚جپuhttpd.confپv‚ًٹJ‚«‚ـ‚·پB ƒCƒ“ƒXƒgپ[ƒ‹گو‚جƒtƒHƒ‹ƒ_پuApache2.2پvپ¨پuconfپvپ¨پuhttpd.conپv‚ًƒGƒfƒBƒ^‚إٹJ‚«‚ـ‚·پB ƒGƒfƒBƒ^‚ھ–³‚¢ڈêچ‡‚حپAپuhttpd.conپvƒtƒ@ƒCƒ‹‚ً‰EƒNƒٹƒbƒN‚إ پuƒvƒچƒOƒ‰ƒ€‚©‚çٹJ‚پvپ¨پuگ„ڈ§‚³‚ꂽƒvƒچƒOƒ‰ƒ€پvپ¨پuNotepadپv‚ـ‚½‚حپuWordPadپv‚إٹJ‚«‚ـ‚·پB پuگ„ڈ§‚³‚ꂽƒvƒچƒOƒ‰ƒ€پv‚ة•\ژ¦‚³‚ê‚ؤ‚¢‚ب‚¢ڈêچ‡‚حپu‚ظ‚©‚جƒvƒچƒOƒ‰ƒ€پv‚ج’†‚ً’T‚µ‚ؤ‚ف‚ؤ‚‚¾‚³‚¢پB |
|||
پEپuhttpd.conپv‚ھگ³ڈي‚ة“®چى‚µ‚ؤ‚¢‚邱‚ئ‚ً‘O’ٌ‚ئ‚µ‚ؤڈ‘‚«‰ء‚¦‚ؤ‚¢‚«‚ـ‚·پB |
|||
‰¼‚ج–¼ڈج‚ً‰؛‹L‚ج’ت‚è‚ئ‚µ‚ـ‚·پBٹeژ©’u‚«ٹ·‚¦‚ؤ‚‚¾‚³‚¢پB پEƒCƒ“ƒXƒgپ[ƒ‹گو‚حپuC:\server\apache2.2پv پE ƒhƒپƒCƒ“‚حپuxxxx.comپv‚ئ‚µ‚ـ‚·پB پEƒTپ[ƒoپ[ƒ}ƒVƒ“‚جIPAddress‚حپu192.168.1.100پv پE TCPپ@‚W‚O”ش پEMyPageپ^Friendپ^پc‚جWebƒTƒCƒg‚جچىگ¬ |
|||
•¶ژڑگF‚جˆس–،‚ح‰؛‹L‚ج’ت‚è‚إ‚·پB پEƒOƒŒپ[‚حŒ´•¶‚إ‚·پB پEچ•‚حƒCƒ“ƒXƒgپ[ƒ‹ژ“™‚ةڈ‘‚«ٹ·‚¦‚ç‚ꂽ•¶ژڑ‚إ‚·پB پEگش‚ح’ا‰ء‚µ‚½•¶ژڑ‚إ‚·پB پE—خ‚ح’چˆسڈ‘‚«‚إ‚·پB |
|||
پ@ پœƒoپ[ƒ`ƒƒƒ‹ƒzƒXƒg‚جچىگ¬پ@پihttpd.confپ@VirtualHostپ@‚جگف’èپj پ@پ@پuhttp://aaa.bbbb.comپvپ@Œ`ژ®‚إ‚جURL•\ژ¦پ@پi‚ئ‚è‚ ‚¦‚¸“®چى‚·‚邾‚¯‚ج‹Lچع‚إ‚·پBپj پuhttp://mypage.xxxx.comپv‚ئپuhttp://friend.xxxx.comپv‚ج•،گ”‚جWebƒTƒCƒgپiƒoپ[ƒ`ƒƒƒ‹ƒzƒXƒgپj‚جچىگ¬ ƒzپ[ƒ€ƒyپ[ƒW—p‚جƒtƒ@ƒCƒ‹‚جٹi”[گوƒtƒHƒ‹ƒ_‚حپuD:\home\mypageپv‚ئپuD:\home\friendپv‚إ‚·پB پ@ |
|||
# ServerName gives the name and port that the server uses to identify itself. |
|||
پ@ پœƒoپ[ƒ`ƒƒƒ‹ƒzƒXƒgگ”‚ھ‘‚¦‚ؤٹا—‚µ‚ة‚‚¢ڈêچ‡‚حپA•ت‚جƒtƒ@ƒCƒ‹‚ًچىگ¬‚µ‚ؤٹا—‚µ‚ـ‚·پB پEhttpd.confپ@‚جچإŒم‚جچs‚ةپ@پuInclude conf/vhosts.confپv‚ً’ا‰ء‚µ‚ـ‚·پB پEC:\server\Apache2.2\conf\‚ةپuvhosts.confپv‚ئ‚¢‚¤ƒtƒ@ƒCƒ‹‚ًچىگ¬‚µ‚ؤپAƒoپ[ƒ`ƒƒƒ‹ƒzƒXƒg‚جگف’è‚ً‹Lچع‚µ‚ـ‚·پB پ@پ¦–¼ڈج‚حپuvirtualhپv‚إ‚àپAژ©•ھ‚ھ•ھ‚©‚è‚â‚·‚¢–¼ڈج‚إ‚à‚©‚ـ‚¢‚ـ‚¹‚ٌپB پ@ |
|||
پ¥httpd.confپ@‚جVirtual hostsپ@پuInclude conf/vhosts.confپv‚ً’ا‰ء‚µ‚ـ‚·پB |
|||
# Real-time info on requests and configuration |
|||
پ¥ڈم‹L‚إ•t‚¯‚½–¼ڈج‚إƒGƒfƒBƒ^پANotepad‚ًٹJ‚¢‚ؤƒtƒ@ƒCƒ‹‚ًچىگ¬‚µ‚ـ‚·پB پEC:\server\Apache2.2\conf\‚ةپuvhosts.confپv‚ئ‚¢‚¤ƒtƒ@ƒCƒ‹‚ًچىگ¬‚µ‚ؤپAƒoپ[ƒ`ƒƒƒ‹ƒzƒXƒg‚جگف’è‚ً‹Lچع‚µ‚ـ‚·پB |
|||
NameVirtualHost *:80 |
|||
پ£ڈم‹L‚ج‚و‚¤‚ة‰ئ‘°پA—Fگl‚جƒyپ[ƒWپumypage
.xxxx.comپvپufriend
.xxxx.comپvپc‚ئڈ‡ژںڈ‘‚«‰ء‚¦‚ؤ‚¢‚ء‚ؤ‚‚¾‚³‚¢پB
پ@ƒzپ[ƒ€ƒyپ[ƒW‚ًچىگ¬‚µ‚½ƒtƒ@ƒCƒ‹‚حپuDocumentRoot "D:\Home\mypage"پv پ@‚إژw’肵‚½ٹK‘w‚ةٹeƒtƒHƒ‹ƒ_‚ًچىگ¬‚µ‚ؤپAhtml‚ً“ü‚ê‚ؤ‚‚¾‚³‚¢پB ƒtƒHƒ‹ƒ_‚ح‚ا‚±‚ةژw’肵‚ؤ‚à‚©‚ـ‚ي‚ب‚¢‚ج‚إ‚·‚ھپAٹK‘w‚ھگ[‚‚ب‚ç‚ب‚¢‚و‚¤‚ة‚ئ •ھ‚©‚è‚â‚·‚‚ـ‚ئ‚ك‚½•û‚ھ—ا‚¢‚©‚ئژv‚¢‚ـ‚·پB پ@ |
|||
| پ@ پœŒآگl—pƒRƒ“ƒeƒ“ƒcƒfƒBƒŒƒNƒgƒٹپ@پ@پ@پ@پuپihttp://www.bbbb.com/~aaaa)پ@URL‚إ‚جƒzپ[ƒ€ƒyپ[ƒWŒfچعپv پ@ |
|||
پ@ |
|||
# htpasswd My Room ------------------------------
# htpasswd Friends Room -------------------------- |
|||
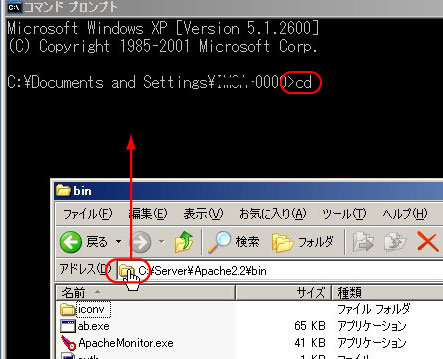
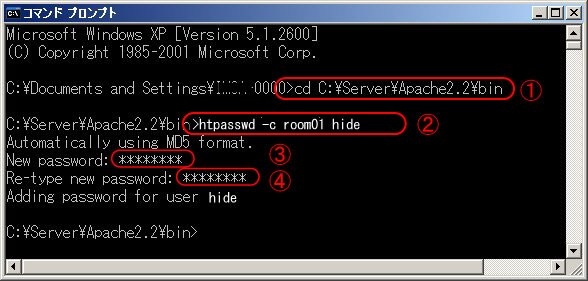
پ@ پEID‚ئƒpƒXƒڈپ[ƒh‚ج“oک^•û–@ پ@ |
|||
|
|||
 |
|||
 |
|||
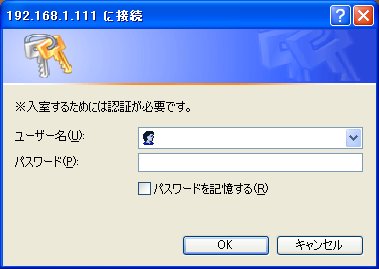
پ@ ٹeƒtƒ@ƒCƒ‹‚ًپ@AuthUserFileپ@‚إژw’肵‚½ڈêڈٹ‚ةٹi”[‚µ‚ؤ‚إ‚«‚ ‚ھ‚è‚إ‚·پB ƒ†پ[ƒU–¼پپIDپ@پ@ƒpƒXƒڈپ[ƒhپ@‚ً“ü—ح‚µ‚ؤپA”Fڈط‚ًژَ‚¯‚ؤ“üژ؛‚µ‚ؤ‚‚¾‚³‚¢پB پ@ |
|||
 |
|||